
Key Takeaways
- Cooking Time: Aim for approximately 20 minutes per pound when cooking beer can chicken at 375°F, ensuring the internal temperature reaches 165°F for safe consumption.
- Moisture and Flavor: The steam from the beer keeps the chicken moist while infusing it with flavor. Experiment with different beer types or alternative liquids for varied taste profiles.
- Crispy Skin: Positioning the chicken upright promotes even cooking and allows hot air to circulate, resulting in a crispy exterior while retaining moisture inside.
- Essential Tools: Use a meat thermometer for accurate temperature readings, a roasting pan to catch drippings, and tongs for easy handling of the chicken.
- Preparation Steps: Select a whole chicken weighing 4-5 pounds and season generously; this ensures maximum flavor and moisture retention during cooking.
- Post-Cooking Tips: Let the chicken rest for 10-15 minutes before carving to allow juices to redistribute, enhancing flavor and tenderness.
Ever wondered how to make that perfectly juicy beer can chicken you’ve seen at backyard barbecues? You’re not alone! Many people struggle with getting the cooking time just right, and it can be frustrating when you want to impress your friends and family with a delicious meal.
Overview of Beer Can Chicken
Beer can chicken involves cooking a chicken while it sits upright on a can of beer. This method keeps the bird moist, thanks to the steam from the beer. As the chicken cooks, the beer heats up and infuses flavor throughout the meat, resulting in a juicy, tender dish.
Key Benefits of Beer Can Chicken
- Moisture Retention: The beer’s steam creates a humid cooking environment, preventing the chicken from drying out.
- Flavor Enhancement: Vary the beer type to change the flavor profile. Consider using lager for a light taste or stout for a richer flavor.
- Crispy Skin: The upright position allows hot air to circulate evenly, producing a crispy skin while the inside remains succulent.
Cooking Procedure
- Preparation: Start with a whole chicken, around 4-5 pounds. Remove the giblets and rinse the bird under cold water. Pat it dry with paper towels.
- Seasoning: Generously season the chicken with your favorite spices or rub. Focus on the inside and out to maximize flavor.
- Beer Can Setup: Open a can of beer and take a few swigs. Place the chicken over the open can, ensuring it stands upright. You can add herbs or spices into the can for extra flavor.
- Oven Cooking: Preheat your oven to 375°F (190°C). Place the chicken on a baking tray to catch any drippings. Cook for approximately 1.5 to 2 hours.
Time Considerations
You might wonder how long to cook beer can chicken in the oven. Aim for around 20 minutes per pound at the recommended temperature. Always check if the internal temperature reaches 165°F (74°C) at the thickest part of the chicken to ensure it’s fully cooked.
Recommended Tools
- Meat Thermometer: Use this tool for accurate temperature readings.
- Roasting Pan: A sturdy pan catches drippings and makes cleanup easy.
- Tongs: Helpful for maneuvering the chicken without dropping it.
- Can other liquids be used? Yes! Besides beer, you can use soda or cider for different flavor profiles.
- What if I don’t have a beer can? A similar-sized container, such as a soda can or even a small baking dish filled with liquid, works well.
Beer can chicken stands out as a fun and delicious way to impress at your next barbecue. Try it, and you may find it becomes your go-to recipe for festive gatherings.
Benefits of Cooking Beer Can Chicken
Beer can chicken offers multiple advantages beyond its unique presentation. Enjoying this dish brings moisture, flavor, and a touch of fun to your cooking experience.
Moisture Retention
Moisture retention stands out as a key benefit of cooking beer can chicken. As the beer heats up, it generates steam that penetrates the meat. This steam keeps the chicken moist, preventing dryness during cooking. Many people appreciate how you can achieve juicy chicken without much effort. The upright position also allows the fat to drip away, enhancing the chicken’s overall texture.
Flavor Infusion
Flavor infusion elevates beer can chicken to a new level. The type of beer you use directly impacts the final taste. For instance, a malty stout adds richness, while a light lager contributes a crisp finish. You can also experiment with different flavor profiles by using other liquids like fruit juices or spices in the can. These options allow you to customize each preparation, making every meal unique and exciting.
Preparation Steps
Getting ready to cook a beer can chicken involves several essential steps to ensure juicy, flavorful results. Follow these guidelines for a successful cooking experience.

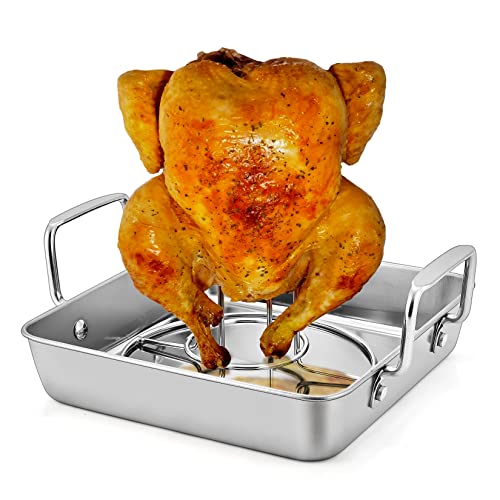
Tips: Before using our cast iron roasting pan, please make sure it has been seasoned. Inside diameter 11", beer can height 3.5".

HEALTHY & NON-TOXIC: TeamFar beer can chicken holder and pan are made of high quality heavy duty stainless steel, No toxic chemical coating and harmful substance leaching into your food, Rust resistance and healthy for daily roasting, Great alternative to aluminum pan and racks

Heavy-duty Cast Iron Roaster:Made of cast iron, pre-seasoned with natural vegetable oil, offers reliable heat retention & even cooking, durable for long-term use.
Choosing the Right Chicken
Select a whole chicken weighing between 4 to 5 pounds for optimal cooking. Look for a bird with a good layer of fat under the skin to enhance moisture retention. Choose antibiotic-free or organic options for the best flavor. Check for freshness by examining the sell-by date, and avoid any signs of discoloration or foul odor.
Selecting the Beer
Opt for a beer that complements the chicken’s flavor. A lager or pale ale works well due to its light profile, but experimenting with stout or IPA can add a unique twist. Choose a beer with a flavor you enjoy, as it will infuse the chicken. For non-alcoholic alternatives, consider using flavored soda, cider, or broth for a comparable effect.
Preparing the Oven
Preheat your oven to 375°F (190°C) before you start cooking. Position the oven rack in the center to ensure even heat distribution. If using a roasting pan, place it on a cookie sheet to catch any drippings. Allow sufficient space around the chicken for airflow; this helps achieve that desirable crispy skin.
Cooking Time Guidelines
Cooking beer can chicken requires careful attention to timing for optimal results. The two main factors influencing cooking time are the weight of the chicken and the oven temperature.

Instant Read Food Thermometer | Our instant read thermometer features a temperature probe and advanced, highly accurate technology with 1-2 seconds response time; Instructions, meat temperature chart, comes pre-calibrated for your convenience, and recalibrating feature if needed.

Temperature Range: 140° to 190°F / 60° to 87°C. Probe Length: 4.75-inches Dial Diameter: 2.375-inches

【Newest beer can chicken stand】- Pour your favorite beer in this beer can chicken stand, it can make Flavorful chicken to impress your guests. AMOZO beer can chicken holder ,a great gift for the grill master in your life!
Weight of the Chicken
The weight of the chicken directly affects cooking time. Generally, cook a chicken for approximately 20 minutes per pound. For example, a 4-pound chicken needs about 80 minutes, while a 5-pound chicken requires around 100 minutes. Always check that the internal temperature reaches 165°F (74°C) for safe consumption. Using a meat thermometer makes this easy. Insert it into the thickest part of the thigh without touching the bone to ensure accuracy.
Oven Temperature
Preheating the oven to 375°F (190°C) creates a consistent cooking environment. Maintaining this temperature throughout the cooking process promotes even heat distribution, ensuring the chicken cooks thoroughly. If you prefer a crispy skin, consider increasing the oven temperature to 400°F (204°C) during the last 15-20 minutes of cooking. This adjustment can enhance the texture without compromising moisture. Always monitor the internal temperature to avoid overcooking, as higher temperatures can dry out the meat.
Tips for Perfect Beer Can Chicken
Achieving perfectly cooked beer can chicken involves a few key techniques. Follow these tips to enhance your cooking experience and the final result.

Cast Iron Chicken Roaster: The roaster is designed for your roasting needs and can be used in the oven, stove, or even on an outdoor grill. It is capable of cooking a large amount of food to meet the needs of family and friends.
【FOOD SAFETY】 Both the roasting pan and chicken holder are made of pure stainless steel without any toxic coatings, No harmful substance releasing at high temperature, Healthy and safe for your daily baking needs, Great replacement for aluminum and unhealthy coating pans
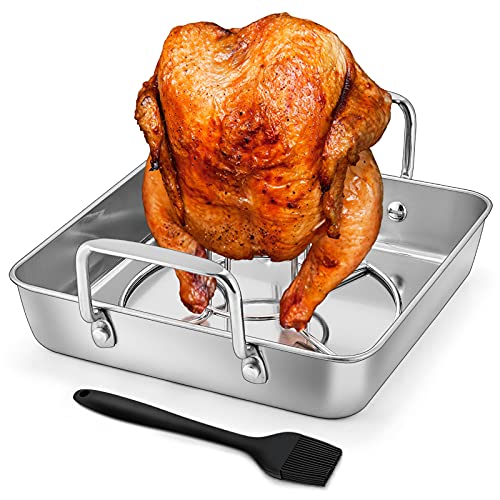
HEAVY GAUGE & DURABLE - HaSteeL beer can chicken holder and roasting pan are made of pure stainless steel without any toxic and chemical substances, Anti-rust and LEAD free, Solid construction holds up to 4-5 pounds of chicken well, No deformation or twisting at high temperatures
Seasoning Techniques
Select your seasoning based on personal preference. Use a dry rub of salt, pepper, garlic powder, and paprika for a classic flavor. Apply the rub under the skin and inside the cavity for deeper flavor penetration. Consider using herbs like thyme or rosemary for an aromatic twist. For an added kick, incorporate cayenne pepper or chili powder.
Experiment with various seasonings. Try a barbecue rub for a smoky taste, or a citrus blend using lemon or lime zest for freshness. Either way, allow the chicken to marinate for at least an hour, preferably overnight, to ensure the flavors meld.
Carving and Serving Suggestions
Carve your chicken once it’s rested for about 10-15 minutes. This allows the juices to redistribute throughout the meat. Start by removing the legs and thighs, then move to the breast. Use a sharp knife for clean cuts.
Serve with complementary sides. Options like grilled vegetables, cornbread, or a fresh salad pair well. For extra flavor, drizzle some pan juices over the chicken before serving.
Enhance your presentation. Arrange the chicken on a platter, garnished with fresh herbs or lemon wedges for color and appeal. Enjoy your delicious beer can chicken with family and friends, making it a memorable centerpiece for any gathering.
Conclusion
Cooking beer can chicken in the oven is a fantastic way to impress your guests with minimal effort. With the right preparation and timing, you’ll end up with a juicy flavorful bird that’s sure to be the star of your gathering.
Don’t hesitate to experiment with different beers or seasonings to make the dish your own. Remember to let the chicken rest before carving to keep all that delicious moisture locked in.
Whether it’s a casual dinner or a festive occasion you can count on beer can chicken to deliver a mouthwatering experience every time. Enjoy the compliments that come your way as you serve up this delightful dish!
Frequently Asked Questions
What is beer can chicken?
Beer can chicken is a popular cooking method where a whole chicken is cooked upright on a can of beer. This technique keeps the chicken moist and infuses flavor while achieving crispy skin.
Why is timing important when cooking beer can chicken?
Timing is crucial because cooking the chicken for approximately 20 minutes per pound ensures it reaches the safe internal temperature of 165°F (74°C) while remaining juicy and flavorful.
What type of beer is best for beer can chicken?
Lighter beers like lagers or pale ales are recommended for a balanced flavor. However, experimenting with stouts or IPAs can create unique taste profiles.
Can I use something other than beer?
Yes, you can use non-alcoholic alternatives like flavored soda, cider, or broth. Similar-sized containers can also work, allowing for various flavor infusions.
What tools do I need for cooking beer can chicken?
Essential tools include a meat thermometer to check doneness, a roasting pan to catch drippings, and tongs for handling the hot chicken safely.
How can I season my beer can chicken?
A basic dry rub of salt, pepper, garlic powder, and paprika works well. You can also marinate the chicken for a deeper flavor before cooking.
How can I achieve crispy skin?
To achieve crispy skin, preheat the oven to 375°F (190°C) and increase the temperature to 400°F (204°C) during the last 15-20 minutes of cooking.
What sides pair well with beer can chicken?
Complementary sides include grilled vegetables, cornbread, or a fresh salad, which enhance the meal and create a festive atmosphere for gatherings.
How long should I let the chicken rest after cooking?
Let the chicken rest for about 10-15 minutes before carving. This allows the juices to redistribute, ensuring every bite remains moist and flavorful.