
Have you ever struggled to open your GE microwave because the door handle’s broken? It’s a frustrating situation that can happen to anyone. Not only does it make cooking a hassle, but it can also lead to more significant issues if left unattended.
Key Takeaways
- Essential Tools: Gather necessary tools like a Phillips screwdriver, flathead screwdriver, pliers, work gloves, and the appropriate replacement handle before starting the replacement process.
- Safety First: Always unplug the microwave and wear work gloves and safety goggles to protect against electric shock and sharp edges while performing the repair.
- Step-by-Step Removal: Carefully locate and remove screws securing the old handle, inspect for remaining debris, and gently pull off the old handle without damaging the door.
- Proper Installation: Align the new handle correctly, secure it with screws, and avoid over-tightening to prevent damage to the microwave’s door.
- Functionality Check: After installation, test the new handle to ensure it opens and closes smoothly before plugging the microwave back in.
- Consult Your Manual: Refer to the microwave’s owner’s manual for model-specific instructions and troubleshooting tips if any issues arise during the replacement process.
Tools Required for Replacement
To replace the door handle on your GE microwave, gather these essential tools:
- Screwdriver: A Phillips screwdriver is needed for removing screws.
- Flathead Screwdriver: This tool helps pry off any clips without damaging the microwave.
- Pliers: Use pliers to grip and remove any stubborn parts attached to the handle.
- Replacement Handle: Ensure you have the correct handle model for your specific GE microwave.
- Work Gloves: Wearing gloves protects your hands from sharp edges while working.
- Towel or Soft Cloth: This prevents scratches on the microwave’s surface during the replacement.
Having these tools ready streamlines the process and helps you complete the replacement efficiently.

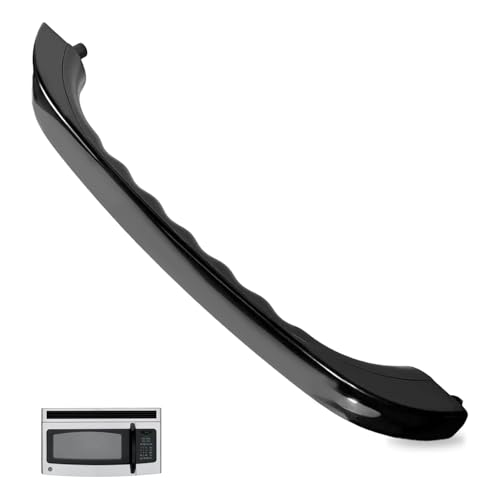
Product Performance:The WB15X10276 microwave handle is prone to breakage, cracking, or loosening when subjected to excessive force or improper use. Choosing professional on-site maintenance in this situation usually incurs high costs. Our replacement handle provides the most economical solution for it
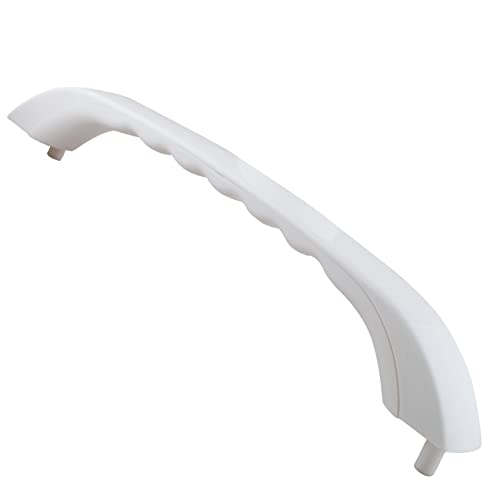
【PLEASE MEASURE BEFORE BUYING - AVOID RETURNS!】This is a GENUINE Podoy replacement door handle compatible with select GE Spacemaker XL microwaves. It is NOT manufactured by GE. To ensure fit: Please measure the distance between the two mounting holes on your microwave door. It MUST be 10.39 inches (26.4 cm). The overall handle length is 11.65 inches (29.6 cm)
Perfect Fit: This microwave door handle pull replacement for GE spacemaker XL series, modles including: JVM1330BW, JVM1339BW, JVM1350BW, JVM1340BW02, JVM1339BW02, JVM1350BW02, JVM1330BW02, JVM1331BW02, JVM1341BW02, JVM1330BW03, JVM1340BW03, JVM1339BW03, JVM1350BW03, JVM1331BW03, JVM1350SY01, JVM1350SY02, JVM1330BW04, JVM1350BW01, JVM1331BW01, JVM1331BW04, JVM1340BW01, JVM1341BW03, JVM1330BW01, JVM1339BW01, JVM1341BW01
Safety Precautions
Prioritize safety when replacing the door handle on your GE microwave. Follow these guidelines to minimize risks.
- Unplug the Microwave: Disconnect the microwave from the power outlet. This step prevents electrical shock during the replacement.
- Wear Work Gloves: Use work gloves to protect your hands from sharp edges or broken parts. This simple measure keeps you safe while handling the microwave components.
- Use Eye Protection: Wear safety goggles to shield your eyes. Debris may fall during the process, and protecting your vision is essential.
- Avoid Moisture: Ensure the microwave is dry before starting repairs. Water around electrical components increases the risk of electric shock.
- Handle Tools Carefully: Keep your tools organized and avoid distractions. A cluttered workspace can lead to accidents or losing parts.
- Check for Sharp Edges: Inspect the door and surrounding areas for sharp pieces. If you notice any, handle them with care to avoid cuts.
- Read the Owner’s Manual: Consult the owner’s manual for specific safety instructions related to your model. Manufacturer guidelines can provide critical insights and precautions.
Taking these precautions helps ensure a safe and effective door handle replacement on your GE microwave.
Step-By-Step Guide
Follow these detailed steps to replace the door handle on your GE microwave. This process involves removing the old handle and installing a new one smoothly.

Microwave handle wb15x10276 can be used to replace all properties of handle wb15X10276, wb06x10943 microwave handle support: Replaceable bracket part numbers: AP5790057, 3025054, PS8753758, B01AQYX6IC; Replaceable handle part numbers: 3025555, AP5790515, PS8754173, EAP8754173.

Microwave door handle with support can be used to replace all properties of microwave handle wb15X10275 wb06X10939 microwave handle support: Replaceable bracket part numbers: 261301814004, PS8753755; Replaceable handle part numbers: 261300714904, PS8754172.

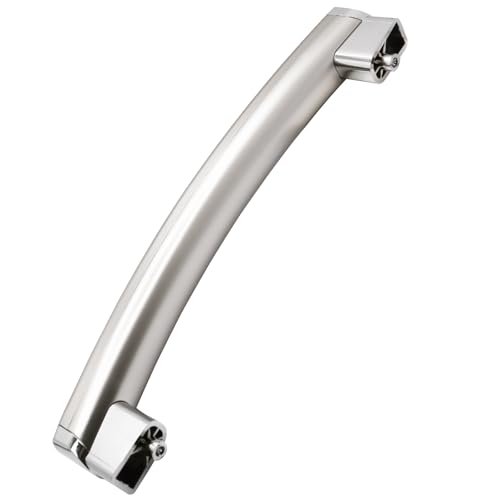
【Heavy Duty WB15X21101 Microwave Handle Replacement for GE Microwave】Upgraded WB15x21101 microwave door handle Center Piece,this is an improved replacement ge microwave door handle, featuring a thicker strong material,One-piece Forming,No Articulation,Not break & More Durable and Long-lasting.Brushed Surface Finish,Corrosion Resistance Heavy duty General Electric microwave oven door handle has precise size match oven door handle dimensions.
Removing the Old Handle
- Unplug the Microwave: Always unplug your microwave to ensure safety during the repair.
- Locate Screws: Check the inside of the microwave door for screws that secure the handle. They are typically hidden near the handle’s base.
- Unscrew Screws: Use the Phillips screwdriver to remove these screws. Keep them in a designated place to avoid losing them.
- Remove Handle: Gently pull the old handle away from the door. If it’s stuck, wiggle it slightly to dislodge it without damaging the door.
- Inspect Areas: Examine the area where the handle was attached for any remaining screws or debris. Clean it using a towel or cloth if necessary.
- Align the New Handle: Position the new handle where the old one was attached. Ensure the holes align with the screws.
- Insert Screws: Place screws into the holes and hand-tighten them initially to make sure the handle is secure.
- Tighten Screws: Use the Phillips screwdriver to tighten the screws fully. Ensure the handle is secure but avoid over-tightening, as this may crack the door.
- Check Functionality: Test the new handle by gently pulling on it. It should open and close smoothly.
- Plug in the Microwave: Once you’re satisfied with the installation, plug the microwave back in. Always double-check that everything is secure before use.
Tips for Successful Replacement
- Gather Tools First: Before starting, ensure you have all the necessary tools on hand. This prevents frustration during the replacement.
- Keep the Area Clean: Clear away any clutter around the microwave. A tidy workspace reduces the risk of losing screws or tools.
- Use Proper Lighting: Work in a well-lit area to clearly see the screws and handle attachments. Good visibility helps avoid mistakes.
- Check Compatibility: Ensure your replacement door handle is the correct model for your GE microwave. A mismatched part can complicate the process.
- Be Gentle: When removing the old handle, apply gentle pressure to avoid breaking the door. Patience is key.
- Secure Screws Firmly: When installing the new handle, tighten screws just enough to hold it securely. Over-tightening can crack the door or strip the screws.
- Test the Handle: After installation, test the handle’s functionality before plugging in the microwave. It should open and close smoothly.
- Consult the Manual: If you encounter issues, refer to the owner’s manual for specific guidance. It may provide valuable troubleshooting tips.
- Follow Safety Protocols: Always remember to wear gloves and goggles during the replacement. Protecting yourself prevents injuries from sharp edges or debris.
By following these practical tips, you can ensure a smooth and successful door handle replacement on your GE microwave.
The microwave door handle wb15x21101can be used replaces model:3025571、AP5790530、PS8754188、EAP8754188、WB15X21101-25PK.

【WB15X10022 Microwave Door Handle】 WB15X10022 microwave door handle is for microwave and will help you easily open and close the microwave door. The overall length of the this black microwave handle is 11". The mounting holes are centered on each end of the handle. Note: Mounting screws are not included

【Product Overview】New Upgrade WB15X26821 door handle (stainless steel color), including new replacement screws. High-quality replacement part for Microwave Oven Door Handle
Conclusion
Replacing the door handle on your GE microwave doesn’t have to be a daunting task. With the right tools and a bit of patience you can restore your microwave to its full functionality. Remember to prioritize safety by unplugging the appliance and wearing gloves while you work.
Once you’ve completed the replacement take a moment to enjoy the satisfaction of a job well done. Testing the new handle ensures everything’s working perfectly. If you follow the steps and tips outlined you’ll find that tackling this minor repair can save you time and frustration in the long run. Happy cooking!
Frequently Asked Questions
What are the common problems with GE microwave door handles?
Many users experience broken or malfunctioning door handles that make it difficult to open their microwaves. This issue can lead to frustration and may result in further complications if not addressed quickly.
What tools do I need to replace a GE microwave door handle?
To replace a GE microwave door handle, gather a Phillips screwdriver, flathead screwdriver, pliers, a replacement handle, work gloves, and a towel or soft cloth for cleaning.
How do I ensure safety while replacing the door handle?
Unplug the microwave to prevent electrical shock, wear work gloves to avoid injuries, and use safety goggles to protect your eyes. Make sure the microwave is dry to reduce the risk of electric shock.
What are the steps to replace a GE microwave door handle?
Start by unplugging the microwave. Then, locate and remove the screws inside the door with a Phillips screwdriver, gently pull off the old handle, and clean the area if needed. Align the new handle and secure it with screws, ensuring not to over-tighten.
How can I ensure the new handle is compatible with my microwave?
Check your microwave’s model number and consult the owner’s manual or manufacturer guidelines to confirm that the replacement handle is compatible with your specific GE microwave model.
What should I do after installing the new handle?
After securing the new handle, test its functionality by gently pulling it to ensure it operates correctly. Make sure everything is secured before plugging the microwave back in for use.